Some Notes on Polar Alignment
by Ray Sterner for the "Company Seven Journal" issue of October 1989
Editor's Note: this technique can be applied to most common Pole Finder Telescope Reticles.
The first time I tried to use my new Meade LX6 8 inch telescope, I had some polar alignment problems. Fighting clouds I tried to check if the polar axis and the telescope optical axis were coincident. I would center Polaris, rotate the telescope 180 degrees and try to correct the error. The process did not converge and when I finally became clouded out, I put the scope away and thought about the problem some more.
Using a Polar Alignment Finder
It seemed the major obstacle was to assure that the optical and polar axes were aligned. Once they are aligned then the 9x6O polar finder on the LX6 would make true polar alignment easy. The polar finder has a reticle with cross-hairs, and two large circles connected every 30 degrees. To setup on the pole, assuming the axes are aligned, Polaris is positioned between the two large circles. The telescope must be turned to make the finder cross hairs vertical and horizontal. Then the angular position of Polaris is found by a separate small cardboard planisphere like device. It really is a little planisphere and is set by matching the date and time. It shows only Polaris and its track across the sky due to precession. The polar finder can get you within a small fraction of a degree of the pole. Because of the diagonal mirror, the image is reversed left to right, and I verified that the little planisphere allowed for this (some planispheres are set for finders that provide a "straight through" view).
Alignment of the telescope polar and optical axes
The manual gives very little instruction on how to align the polar and optical axes. It mostly says they are factory adjusted. I have worked out a way to align these axes that does not depend on the declination dial being set accurately; it can be set after the axes are aligned.
To start, align the polar axis as closely as possible by lining up on the main tube and mounting forks, then sight along the tube to point it toward Polaris. Any star would do for aligning the polar and optical axes, but Polaris is the most convenient since it moves slowly and will be needed later anyway.
Second, the finder scope will be aligned with the rotation axes. The main telescope will follow later, so for now it doesn't matter that the declination is not exactly at 90 degrees.
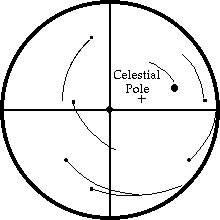
Figure 1 shows a view through a finder scope (any finder with cross hairs). The view assumes that a rough axis alignment has been done, so that the polar axis of the telescope (not the true celestial pole yet) is somewhere in the finder's field of view.
Lock both axes and move the telescope to center Polaris in the cross-hairs. Fine adjustment screws on the mount (wedge/tripod) help a lot for this step. However, I found some problem with the image shifting as the latitude adjuster was tightened after fine tuning, and the latitude fine adjuster could be better.

At Right: Figure 1. Finding the telescope polar axis. + = Celestial Pole, the sweeping arcs denote motion of stars around the Celestial Pole.
Next, loosen the RA axis and rotate the telescope about the polar axis by 180 degrees, then lock the axis. The Figure 1 shows this rotation by the dotted half circles.
After the rotation, the telescope polar axis position is known, it is halfway from Polaris to the cross hair intersection point. Without moving the scope, adjust the finder scope to put the cross hairs on that point as best as is possible (by shifting Polaris from where it is to half as far from the center of the finder).
Then, with the axes locked, move the entire scope as before to center Polaris again. Now the rotation axis should point at Polaris but since the axis point is invisible, several iterations may be needed. However, this process should converge, and finally Polaris should stay centered as the telescope is rotated about the polar axis. At this point the finder scope axis is aligned with the telescope rotation axis, and both are marked by Polaris.
Now loosen both axes, center Polaris in the main scope, lock it there, and readjust the finder to center it again. Now the axes and the finder are aligned, and the telescope mount declination dial may be set to 90 degrees. The final polar alignment may be done as described above.
Finding the pole without a polar alignment finder
This procedure was tried and found to work well. However, not everyone has a polar finder, and the little planisphere can get lost, so here are some ideas on how to rough it. The polar and optical axes should still be aligned as before. The little planisphere may be replaced by a standard, everyday planisphere. A star with the Right Ascension (RA) as Polaris may be used to find the angle need to offset Polaris from the center of the finder.
Measure the angular width of the finder's field of view, then estimate the distance of Polaris from the field's center. The planisphere should be used to find the star's angle relative to straight up by holding the planisphere with south at the top. Then the star's relative position to the center of the finder is the same as Polaris' relative position to the center of the finder. Take care to allow for any differences of the image from the planisphere view. With a normal diagonal the image is reversed left to right (but not top and bottom). With a straight through finder the image is turned 180 degrees. Rotating the telescope to make the finder cross-hairs vertical and horizontal may help in positioning Polaris to the correct angle.
What star can be used for this purpose? No one star does very well for a long time period because Polaris is so close to the pole that precession changes it's RA a lot in a few years. But because it is so close to the pole, a very good approximation to its motion is a straight line. I have used some positions listed in the almanacs to interpolate and extrapolate the coordinates of Polaris for the years listed in Table 1. For a date of interest, use the closest year in the table. For the planisphere star use the star listed in the table.
A complication may arise because most planispheres do not allow the stars below the horizon to be seen, and since the suggested stars are all far from the pole they are often below the horizon. One solution is to use a time 12 hours away and turn the planisphere 180 degrees. But sometimes the star will again be below the horizon, but on the other side of the sky. Another trick is to lay a straight edge along the line from the pole (at the center of the planisphere) and the star, and see what visible point is on this same line, and use that point as you would the original star.
| Year | Right Ascension | Declination | Polar Distance | Star |
|---|---|---|---|---|
| 1960 | 1 Degree 55.7 Min. | 89 Degree 04.7 Min. | 0.92 Degree | Eta Cassiopeia (45) |
| 1970 | 2 Degrees 03.3 Min. | 89 Degrees 07.6 Min. | 0.87 Degree | Gamma Andromeda (57) |
| 1980 | 2 Degrees 11.8 Min. | 89 Degrees 10.4 Min. | 0.83 Degree | Beta Triangulum (4) |
| 1990 | 2 Degrees 21.2 Min. | 89 Degrees 13.2 Min. | 0.78 Degree | Gamma Triangulum (9) |
| 2000 | 2 Degrees 31.9 Min. | 89 Degrees 15.8 Min. | 0.74 Degree | Epsilon Cetus (73) |
| 2010 | 2 Degrees 43.9 Min. | 89 Degrees 18.4 Min. | 0.69 Degree | Gamma Cetus (86) |
Above: Table 1. Positions of Polaris and stars with the same R.A .
Contents Copyright 1994-2000 Company Seven - All Rights Reserved

