|
C-7 Home Page
Questar Distribution
Questar Telescopes |
|||||||||||||||

|

PIGGYBACK MOUNT FOR QUESTAR 3-½ ASTRONOMICAL TELESCOPES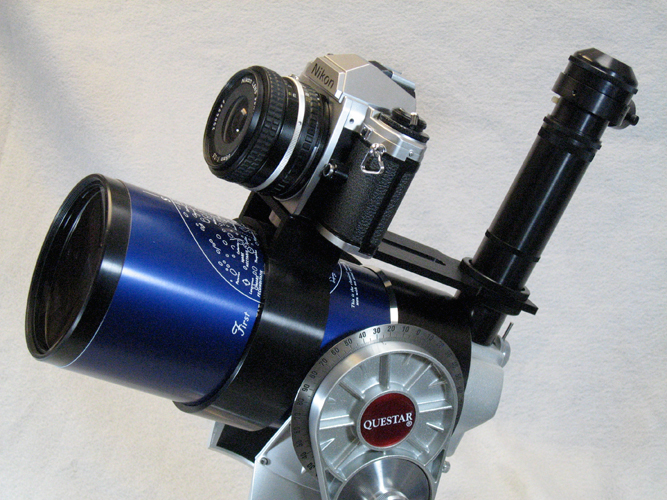 The Questar 3-1/2 telescopes have been regarded as the finest compact telescopes of their class since they were introduced in 1954. These telescopes incorporate many features that make them handy and rewarding to use visually. However, over the past fifty years the Questar evolved into the first truly comprehensive system with accessories for both visual and for astrophotograhic pursuits. And so the Questar can also accept a broad range of accessories for imaging with film cameras, digital cameras, and CCD cooled cameras. Among the easiest ways to enter the realm of astrophotography with an astronomical model Questar is to employ the "Piggyback" technique, and for this Questar makes this superbly constructed accessory.
Right: Questar 3-1/2 telescope with Piggyback Mount, and with optional and Questar Guiding Eyepiece attached and with a Nikon SLR camera (192,791 bytes). For simplicity, we do not show some of the recommended accessories discussed in this article. Piggyback photography is among the easiest astrophotography techniques, and by using this approach can achieve remarkable results. The Piggyback Mount is a set of machined aluminum hardware that supports a payload firmly in place atop the barrel of the Questar telescope. The payload is held into the platform by a 1/4-20 tpi bolt. So the payload can be a 35mm SLR (as shown here) or rangefinder camera, or it can be a digital camera with lens set to infinity focus, or it can be a CCD camera with lens. The telescope becomes the tracking platform that guides the payload along, with the lens of the attached device fixed onto a celestial target over a period of seconds, minutes, or even hours. This is among the best techniques for acquiring images of immense areas of sky; an entire constellation, or a large comet for examples will be among the best candidates for this comparatively low magnification method of astrophotography. And since the magnifications typically employed are so modest, the efforts to maintain precise tracking (guiding the telescope to compensate for Polar Alignment inaccuracy) are not as demanding as those of most other techniques. Incidentally, the Questar drive system lacks periodic error and so this is one less concern for the enthusiast.
The Earth rotates about its axis once full turn over a period of just under a day. As the Earth rotates in space the celestial objects overhead appear to move in an arc across the sky.
Left: Click image if you wish to see an animated movie of the Earth Rotating.
|
||||||||||||||
|
A Quick Primer to the observer located in the Northern Hemisphere celestial objects rise in the Eastern horizon, gradually moving in an arc up and right across the sky towards the South, and then continue moving to the right and down towards the Western horizon. This motion can be observed with the naked eye if one carefully observes the limb of the Moon as it rises or sets behind trees or some other fixed object in the distance, the motion though slow is perceptible. A telescope provides magnifications far beyond that of the human eye, as the magnification of a telescope in increased (25X to 50X, 50x to 100X, etc.) then this motion of an object drifting across the sky will appear accelerated.
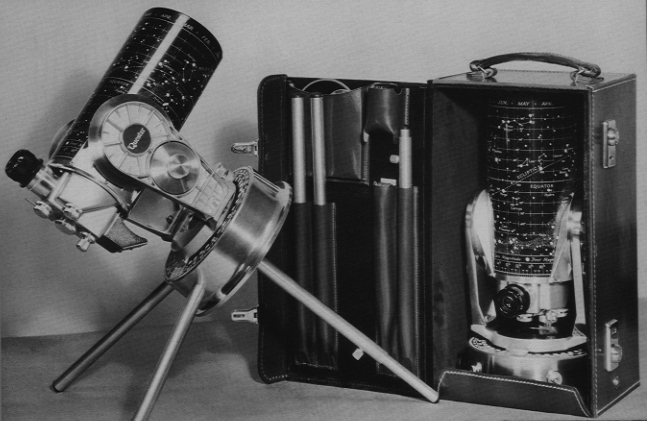
Right: Early 1960's Questar Standard 3-½ telescope shown at left in Polar Aligned astronomical configuration on it's furnished Tabletop Tripod (Standard Center Leg), and also shown to the right stored in original Leather Carrying Case with standard accessories. The drive of a telescope is sometimes referred to as a "Clock Drive" since the earliest mechanical telescope drives were clock mechanisms modified to rotate only once every 24 hours. With the Questar, you can walk away from the telescope and come back later to find the telescope still on the target. The Questar Fork Mount is basically an Alt-Azimuth mount, it moves up and down left and right, and so it can easily be used for terrestrial applications. For tracking in astronomical uses, the Fork Mount is fitted with either its tabletop tripod legs, or onto an Equatorial Wedge such as that on our Tristand. The Wedge has an adjustable Tilt Plate which is raised or lowered so that the R.A. rotational axis of the Fork can be aligned to the rotational axis of Earth. Hints When using the Piggyback Mount start off simply, and with lower magnification or even wide angle lenses. While most people think telescopes need to operate at silly high magnifications, many celestial objects are so immense that many telescopes can not show or photograph them in one field. So keep in mind that to photograph any of the larger Constellations or Comets often requires using a wide angle lens on the order of 20 to 24mm and not much higher than normal 50mm lens on a conventional 35mm camera. However, many modern digital SLR cameras have detectors that are not as large as the traditional full frame cameras that were 24mm x 36mm x 43 mm. Company Seven recommends Canon as one of the few who make good full frame 35mm SLR digital cameras. And so when using the smaller format digital cameras understand you may have to use even lower focal length lenses. Depending on the weight of the lens you can accommodate lenses of up to 100mm focal length, maybe more. To assist in focusing it is desirable to use relatively 'fast' lenses, with maximum ratios on the order of f/1.2, f/1.4, f2.0 for example. But when using fast lenses, the best star images are obtained with the lens stopped down a few stops or more from the maximum. To lean how to calculate aspects including Field of View, drift errors, etc. refer to our article "Astronomical Forumalas for Telescopes". |
|||||||||||||||
Attaching the Piggyback Mount
QUESTAR PIGGYBACK BRACKET SPECIFICATIONS:
* Specifications given are as measured by Company Seven, subject change. For more information about how to work your way through the decision making process of choosing and specifying a Questar 3-1/2 telescope, their common accessories, and desirable options please feel free to call us or send an E-mail inquiry, or visit our showroom. You may find more help by referring to the articles in our Questar Library section on line.
|
|||||||||||||||
|
|
Contents Copyright 1994-2007 Company Seven All Rights Reserved |